Start here
What would you like to make?
Choose a task, follow the steps, and check the result on your own content.
Get started
Set up your motion builder.
Use the plugin made for your editor. Elementor 4 is required. Your downloads and license keys are in your bitPlugins account.
- Sign in to your account with the purchase email. Download the ZIP for Elementor Motion; leave the ZIP compressed.
- In WordPress, open Plugins > Add New Plugin > Upload Plugin. Select the ZIP, install, and activate it.
- Open the product license screen in the WordPress admin menu and enter the license key for this product. A license for the other editor is not interchangeable.
- Open the Preset Library. Confirm the built-in presets appear, then open a test page in Elementor 4.
Get started
Animate one existing heading.
Start with one text preset and a Page load trigger. This makes it easy to confirm the selected target before adding more complex behavior.
- Open a page in Elementor 4 and select a heading with its final text.
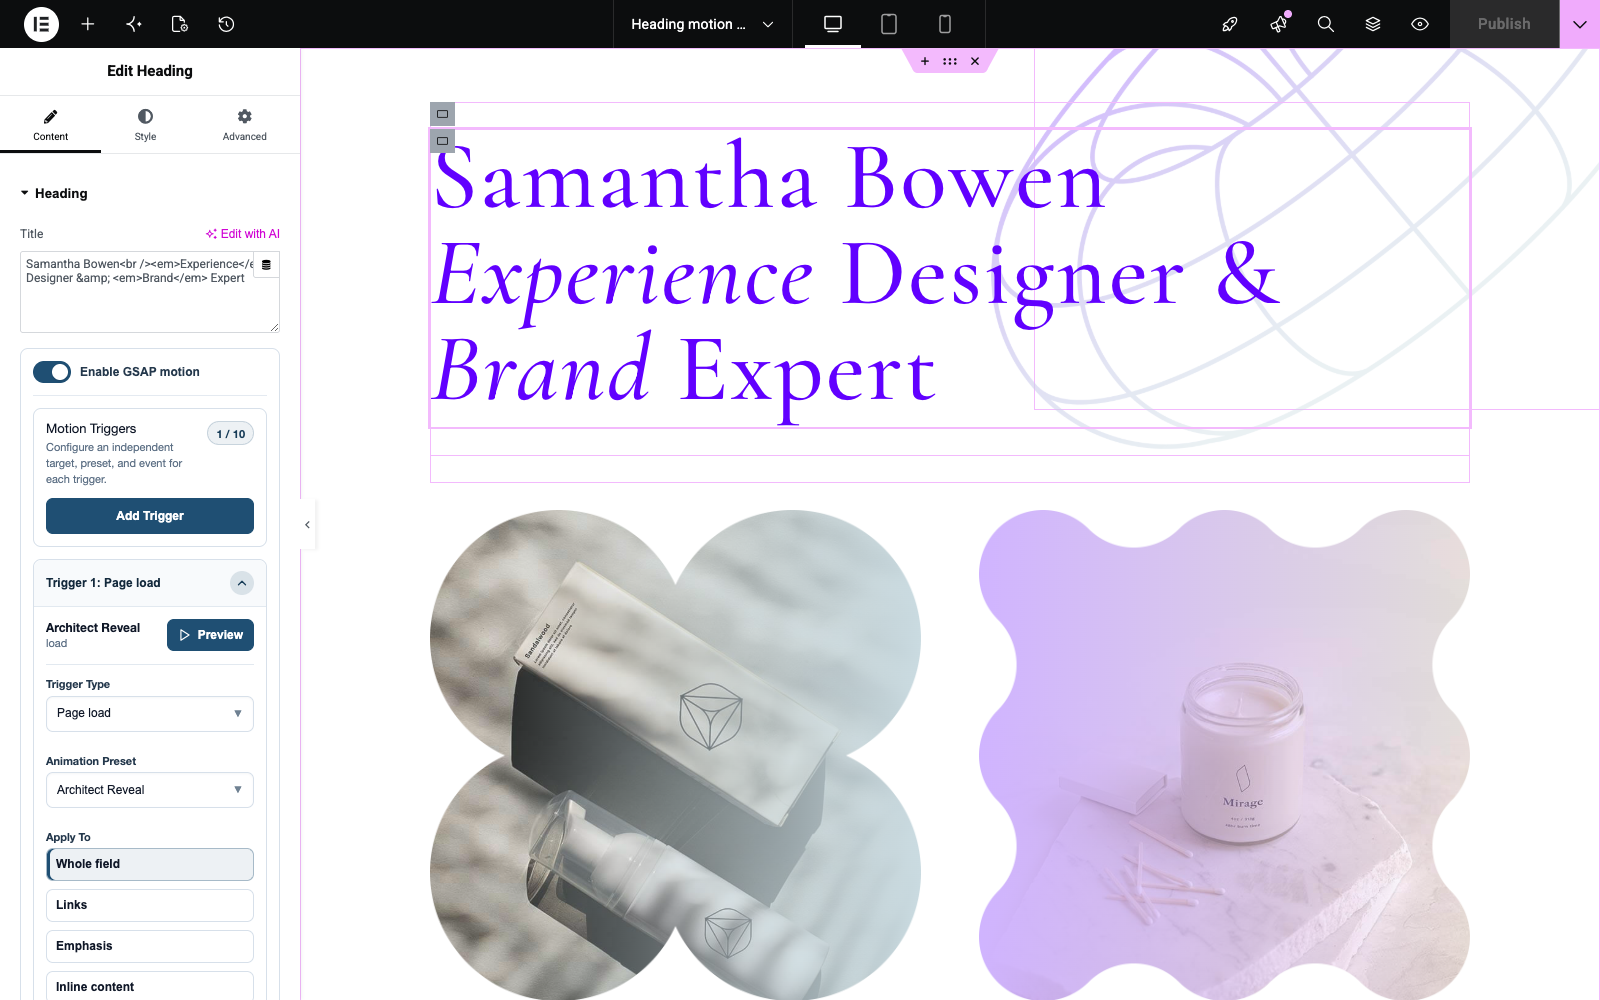
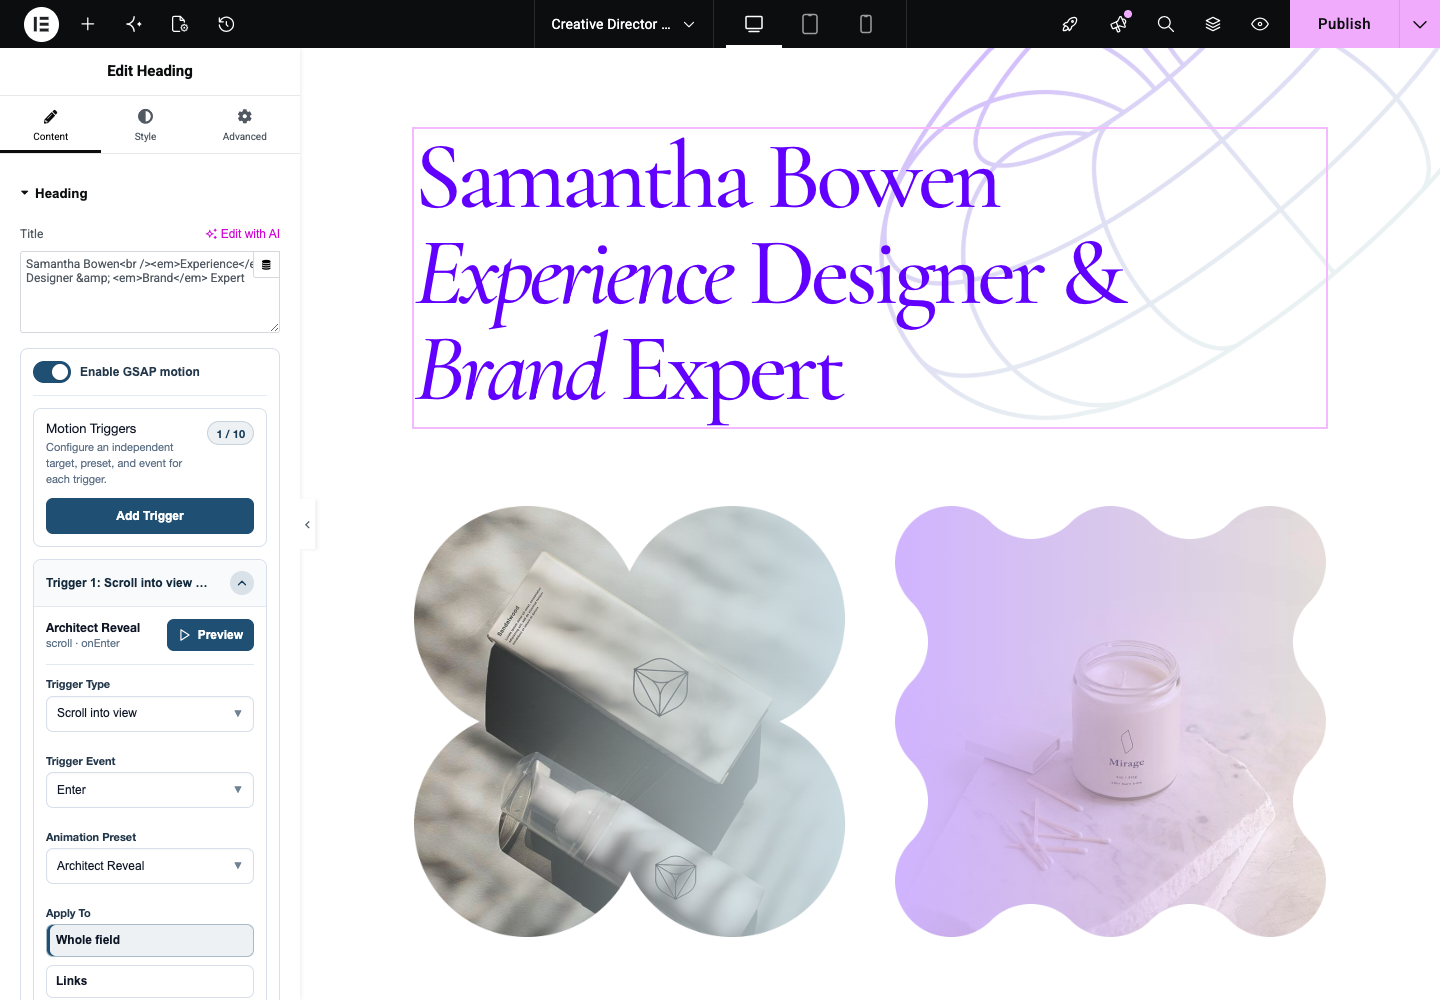
- In the Heading widget Content tab, find Enable GSAP motion directly below Title. Container-level motion is separate from this field.
- Enable GSAP motion. Choose Architect Reveal under Animation Preset. Keep Apply To on Whole field and Animate As on Elements for this example.
- Set Trigger Type to Page load. Use Preview and check that only the intended heading moves.
- Save or update the page. Open its public URL in a new tab and check the saved result at desktop and mobile widths.
Build motion
Create the motion. Choose where and when it runs.
A preset stores reusable animation. A trigger attaches it to selected content and decides when it plays. Changing a trigger does not require duplicating the preset.
The selected block, widget content, or layout container.
The visual properties, easing, and sequence you want to reuse.
The whole selected layer or compatible content inside it.
The element or supported event source that starts the animation.
The settings that control the selected targets, repetition, and sequencing.
Build motion
Start with a preset. Keep control of the result.
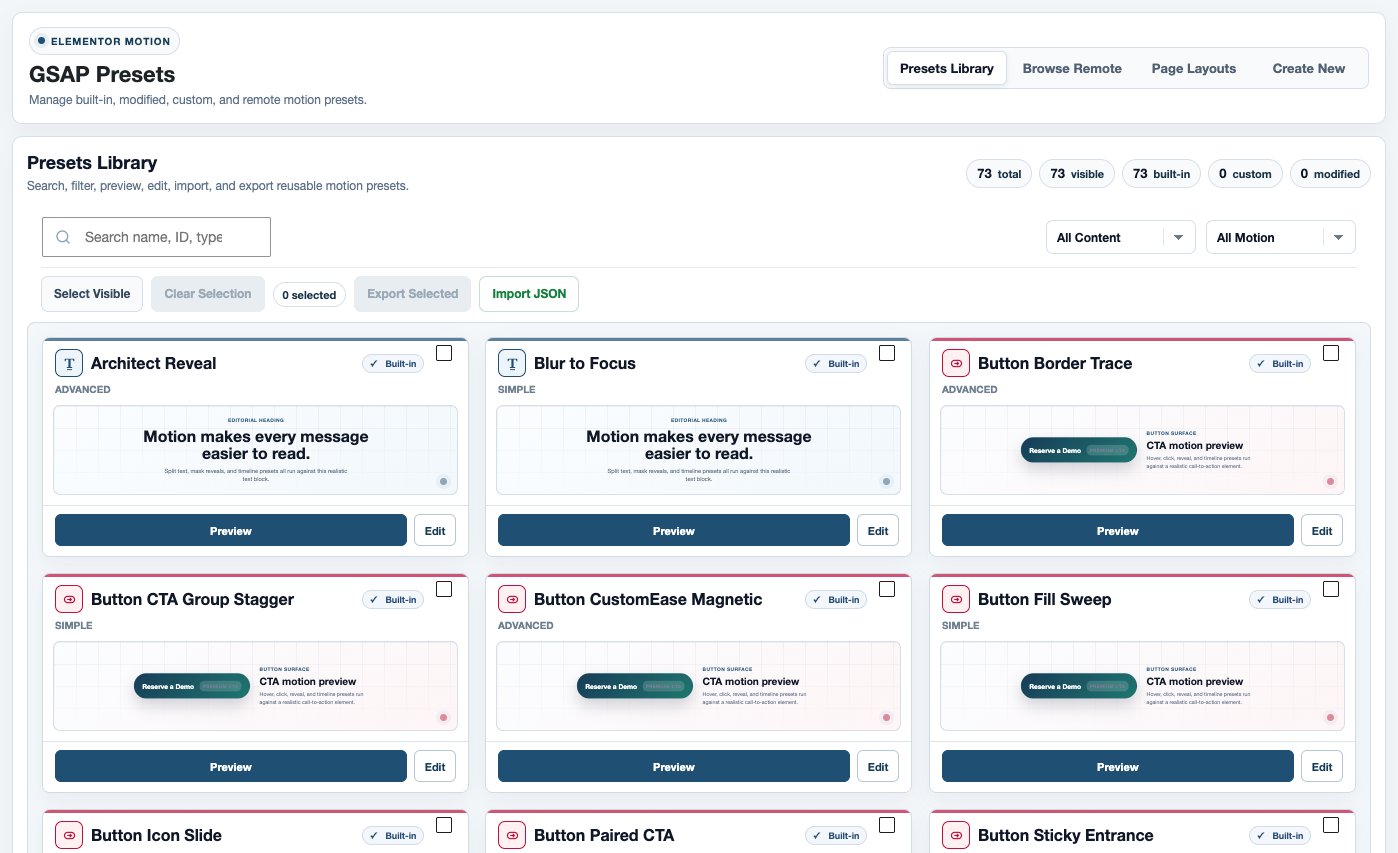
The library contains editable built-in presets. Search by name and filter by content type or motion structure before opening a preview.
A focused animation for a compatible target.
A coordinated sequence that includes parent and child phases.
Multiple motion steps with deliberate order, overlap, and timing.
- Open the Preset Library and select a content type such as Text, Image, Button, or Layout.
- Preview a candidate against its sample content. Replay to inspect the start and finish, not only the final frame.
- Choose Edit to change its animation. Review properties, timing, easing, and any target-dependent settings.
- Save, return to the page, and preview each placement that uses the preset. Use the built-in reset action when you need the shipped values again.
Build motion
Compose a sequence, not a pile of effects.
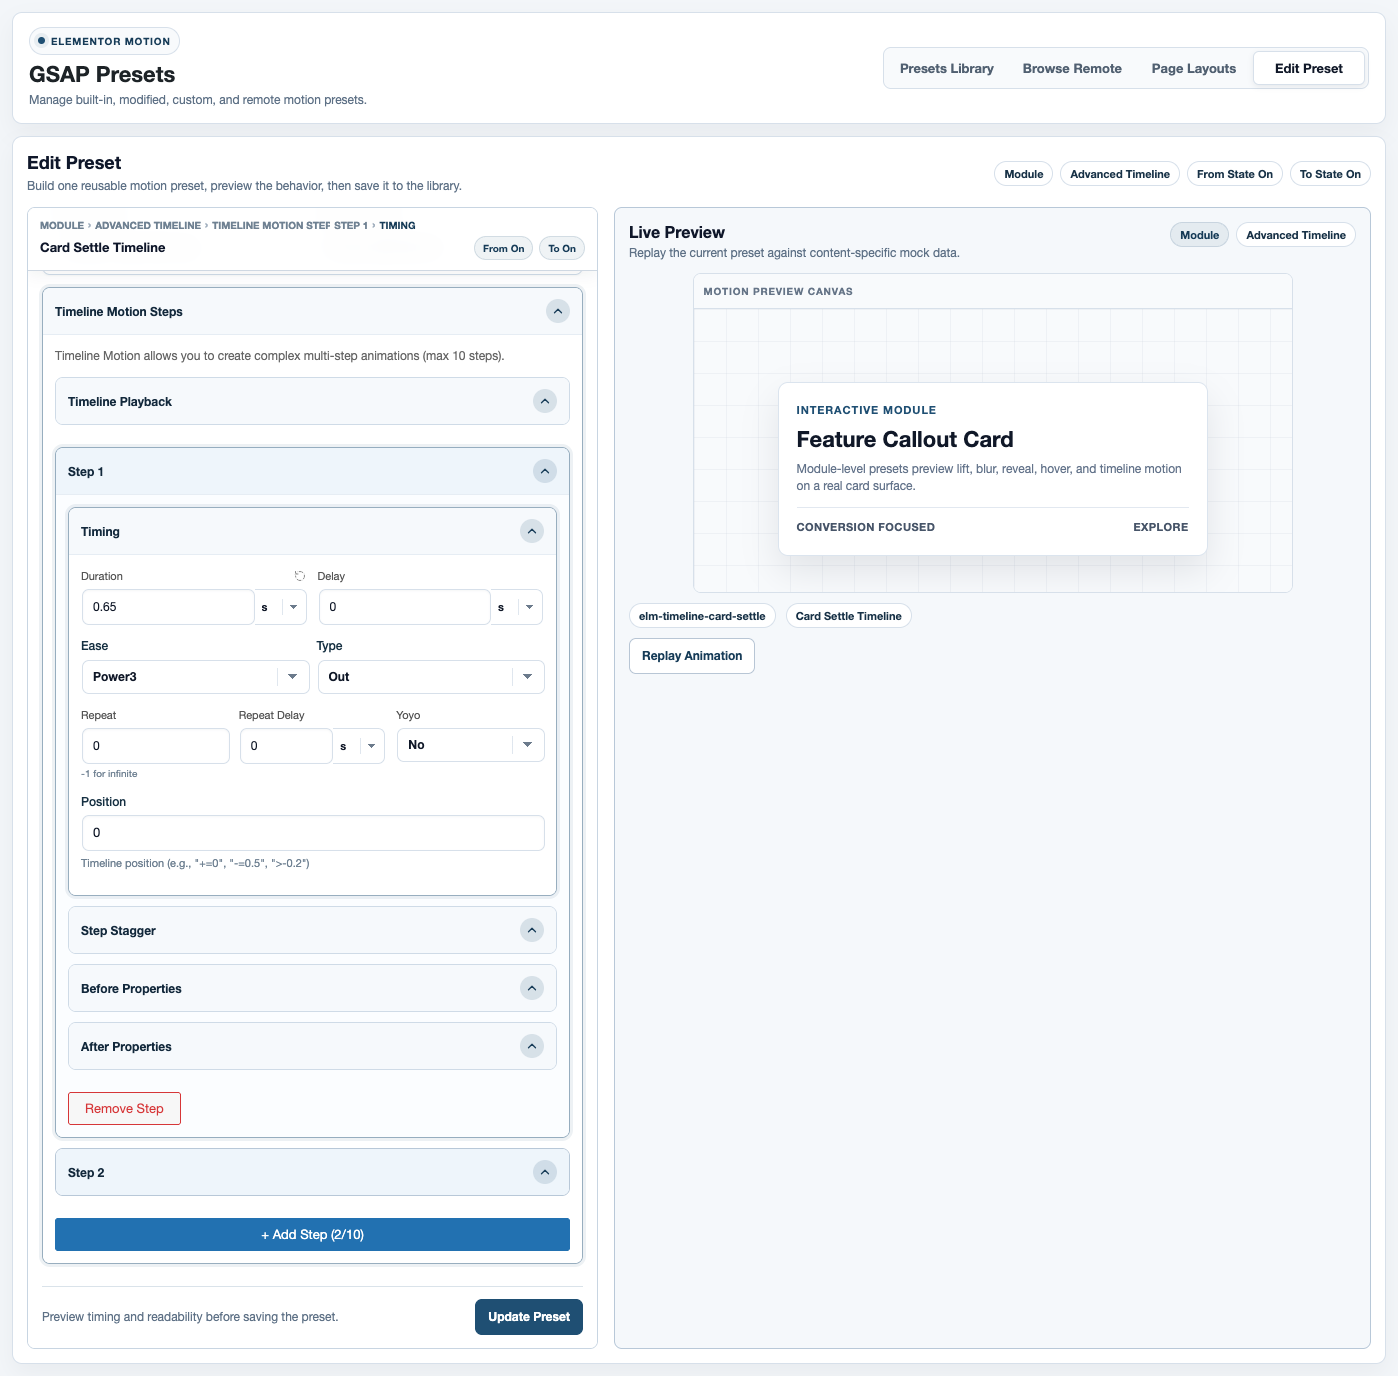
Use Advanced Timeline when one animation cannot express the movement. Use Simple Motion when a single move is enough, and Staged Motion for a reusable parent-and-child sequence.
- Open Create New, choose the content type, and select Advanced Timeline.
- Set the first step to establish the starting movement. Add properties that the selected content can actually render.
- Add the next step. Adjust its position and duration to follow or overlap the first.
- Choose easing and stagger only where they serve the sequence. Replay the complete timeline after each timing change.
- Save the preset, apply it to real content, and test it with the intended trigger. A scroll-scrub timeline must also work when the visitor scrolls backward.
Build motion
Give the movement its pace.
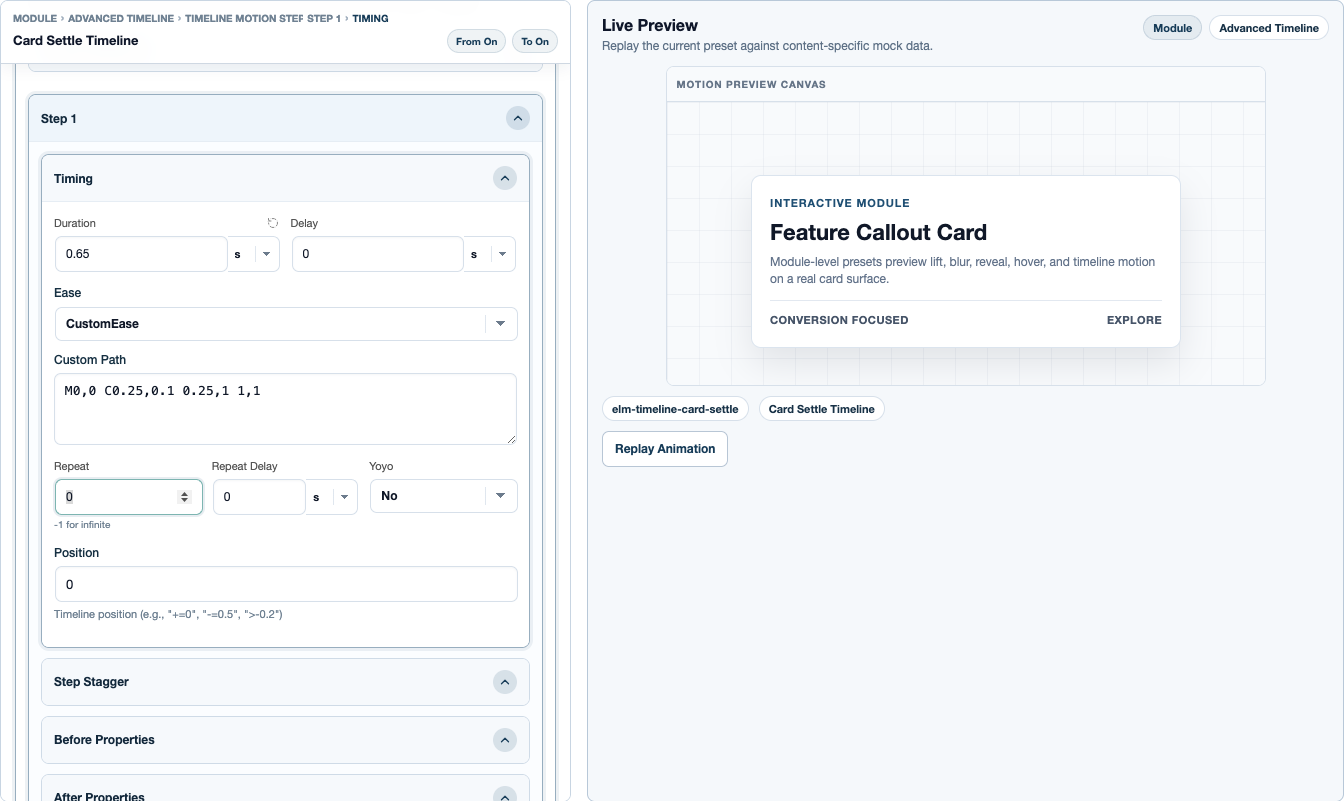
Ease controls acceleration, not the animation duration. Choose a standard ease for a familiar finish, or CustomEase when you need a particular curve. The curve is saved with the preset.
How long the step runs, in seconds. Keep this constant while comparing easing curves.
In, Out, or InOut for ease families that expose direction.
The curve definition used by CustomEase. This is an easing path, not a path that the element follows.
M0,0 C0.25,0.1 0.25,1 1,1 is a useful starting point for a smooth ease. Compare it with Power3 Out at the same duration.
- Open a preset and expand Timing. In an Advanced Timeline, open Timing inside the step you want to change.
- Start with Power3 and Type Out. Replay the same duration to see how the movement slows into its final position.
- Choose CustomEase in the Ease selector. Enter your curve in Custom Path, then leave the field to validate it.
- Replay the full sequence. A curve that looks good on one step may feel abrupt when it overlaps another. Save only after checking the combined result.
Build motion
Reveal letters, or move them. Know the difference.
SplitText makes lines, words, or characters available as animation targets. ScrambleText changes the displayed characters while revealing the final text. They are different effects, not two names for the same setting.
The temporary characters used during the scramble, not the final copy.
The rate at which temporary characters change.
How long to wait before revealing the final characters.
Whether the displayed text length changes progressively during the effect.
- Use a short heading or label. Open a compatible Text preset, or a text step in Advanced Timeline.
- Expand ScrambleText and turn on Enable ScrambleText. Choose a Characters set, such as Letters Mixed Case, Uppercase, or Numbers.
- As a starting experiment, use Speed 0.35 and Reveal Delay 0. Keep the duration short enough that the final message is easy to read.
- Compare Tween text length enabled and disabled. Preview the original content before saving, and check that the final text has not been changed or truncated.
Target content
Animate the part that matters.
Elementor separates widget fields from layout containers. A Heading field, Text Editor body, image, and complete container have different target options. Select the field that owns the content.
Moves the compatible field or selected element together.
Uses current text wrapping. Retest after font, width, or responsive changes.
Useful for pacing a heading without animating every letter.
Suitable for short display text. Long character sequences can delay reading.
Where supported, narrow rich content to headings, paragraphs, list items, links, or other available nodes before choosing how they animate.
- Select the content, then review Apply To before adjusting timing.
- Choose the semantic target where available. Narrow heading levels or nested content when the control offers those options.
- Choose element, line, word, or character granularity only when compatible with the selected preset.
- Preview and check the untouched content too. A paragraph should not move if the intention is to animate only headings.
Target content
Move a group together, or one child after another.
Select a container to work at layout level. Container motion moves that layer together; Direct Children selects its immediate rendered children.
Reusable choreography inside a tween or timeline step.
How this placement distributes the selected targets or groups. It does not rewrite the saved preset.
A gap between target starts, or a total spread across the collection, depending on the selected distribution mode.
Direct Children selects immediate rendered children only. It does not recursively animate every descendant.
- Select the parent layout and open its motion controls.
- Choose Container for one coordinated movement, or Direct Children for sibling targets.
- For three sibling cards, open Selected Target Playback and choose Each target separately under Playback Scope. Under Target Timing, choose Play one after another.
- Start with Interval 0.08 seconds and the first-to-last order. Preview the first and last card, then repeat after the layout wraps on mobile. Adjust the interval for the actual child count.
- Use All selected targets and Use preset timing when the preset should choreograph the entire selected collection. Use Each target group only when the resolver supplies distinct groups, such as several text blocks.
- Preview with nested children and responsive wrapping. Verify any child that also owns motion does not compete with the parent for the same properties.
Target content
Keep the interaction usable.
An animation should reinforce the action, not move it out of reach. Keep click targets stable and use supported contextual targets.
Select the supported button content target. Verify that the link still works on click and tap.
Check crop, clipping, transform origin and the final image bounds at each breakpoint.
Where supported, distinguish the complete menu, its items and nested submenus. Check desktop, mobile and keyboard navigation separately.
Control playback
Choose the moment, then its settings.
Trigger Type changes which controls are relevant. Start with one trigger and verify its behavior before combining events.
Starts when the page motion runtime is ready. A useful starting point for first-viewport content.
Responds to viewport boundaries. Check forward and backward entry or exit where available.
Connects progress to scrolling. Verify start, end, and backward scrolling.
Responds to interaction with a compatible target. Preserve the element's normal action.
Maps pointer movement over the target or viewport. Provide a useful static state on touch devices.
Requires the named event to be dispatched by your own integration. Entering a name alone does not create that event.
- Choose Trigger Type, then Trigger Event when shown.
- Check Trigger On. It describes the event source, not necessarily the content being animated.
- Configure only the dependent controls the selected mode exposes. For scrolling, test the start and end against the actual page length.
- Preview, then test the real event on the saved frontend. Replay alone does not exercise every hover, scroll or event lifecycle.
Control playback
Give each trigger a distinct job.
Use more than one trigger when the target needs an entrance and a later interaction. Avoid two independent animations writing the same property at the same time.
- Make the first trigger work by itself. Add the second only after checking the first animation's final state.
- For example, combine an entrance with a subtle later hover response, not two competing entrances.
- Review playback, reset, repeat, delay, and yoyo where available. A repeated animation should not prevent reading or clicking.
- Test in sequence: page load, enter, leave, re-enter, interact, scroll backward, then resize. Disable each trigger in turn if the result is unexpected.
Control playback
Start small. Check a specific result.
These examples use the existing library and your real content. Change one decision at a time so you can see what it affects.
Select a Heading. Choose Line Slide Up and a line target where the preset requires it. Use Page load, preview, then publish. Expected result: the heading reveals once; neighbouring paragraphs stay unchanged.
Select a container. Choose a compatible layout preset and Direct Children. Use the supported selected-target sequencing controls for separate child playback. Expected result: immediate children enter in order; nested text is not accidentally treated as another card.
Begin with one button entrance. Add a separate compatible hover preset only after verifying the entrance final state. Expected result: the link remains clickable, keyboard focus remains visible, and leaving hover restores the intended state.
Control playback
Check the page, not only the sample.
The preset preview helps create motion. Editor preview checks the selected content. The frontend confirms the saved configuration in the actual visitor environment.
- Replay the preset in the library and inspect its full sequence.
- Apply it to the intended content and preview from the trigger controls.
- Close editing panels and check the whole composition. Make sure motion does not hide or distract from important content.
- Save and open the published page in a fresh tab. Test desktop and mobile widths, scrolling, links and keyboard focus.
- Repeat with reduced motion enabled and with your real cache and optimization settings. Content must remain readable when animation is reduced.

Control playback
Keep the content usable while it moves.
Motion must preserve reading, clicking and navigation. Measure the complete page with its real images, fonts and optimization settings, rather than relying on an isolated preset preview.
- Check the final visible state with animation disabled. Keep important first-viewport copy and images available without waiting for a long entrance.
- Prefer transforms and opacity for entrances. Test layout properties, filters and large blurred layers deliberately because they can add rendering work.
- Count selected children and split-text targets. Use words or lines for long headings and whole elements for body copy when a character cascade would delay reading.
- Enable the operating system reduced-motion preference before loading the page. Verify visible content, usable links and ordinary navigation without unnecessary scrub, pinning or pointer motion.
- Resize and change orientation after playback. Check for duplicate text wrappers, stale pin spacing and targets left hidden by competing parent and child assignments.
- Compare repeated mobile performance traces with and without the tested assignments. Record the URL, viewport, versions, target count and exact preset/trigger settings; one score is not a universal plugin benchmark.
Manage your site
Treat navigation as its own experience.
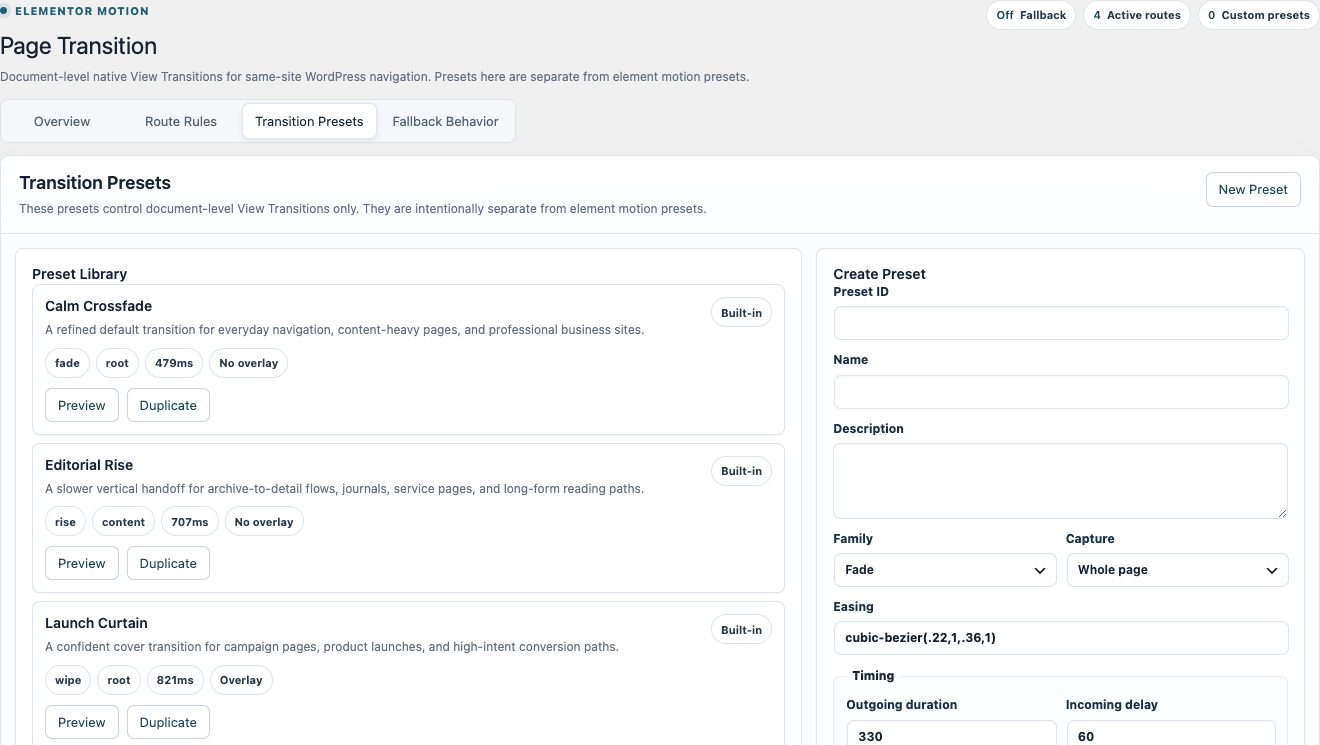
Page transitions are document-level effects, separate from element motion presets. Configure them from the product's Page Transition menu.
- Select or customize a transition preset. Use its own preview to inspect the navigation effect.
- Set fallback behavior for navigation that does not match a more specific rule.
- Add a route rule. Choose the source and destination using the available page or route conditions.
- Keep specific exceptions above broad rules. Test the intended source-to-destination journey in the route tools and through actual same-site links.
- Check page-level participation and verify the incoming page's own motion. Browsers without the required native support must still navigate normally.
Manage your site
Bring the asset and its motion into your site.
Built-in presets are already available locally. Remote presets must be saved to your library before they can be used as local animation definitions.
- Use Browse Remote to find and preview a compatible preset, then import or save it to the library.
- For a complete starting point, open Page Layouts and preview the full page.
- Import the layout using the product's layout workflow. Its required presets must be present with it.
- Open the imported page in Elementor 4. Inspect several content and container triggers before replacing the sample content.
- After editing, save the page and verify its frontend. Changing text length, image size or nesting can change animation timing and targets.
Manage your site
Find the first point that behaves differently.
Begin with the smallest failing target. Keep the preset and event simple until the underlying issue is clear.
Confirm the required editor version and select a supported content or layout context. Parent and child blocks can expose different controls.
Confirm the preset exists in the local library. Import a missing remote dependency before selecting it again.
Save the page, check the target on the frontend and clear page caches. Test without script-delay or combination to isolate optimization issues.
Check the initial and final preset state, duplicate entrances, delayed assets and competing parent/child motion.
Wait for fonts and images. Recheck split-line behavior at the affected width.
Check page participation, enabled rules, route priority and native browser support.
Manage your site
One account. The right access for each product.
Use your checkout email to access bitPlugins. Gutenberg Motion and Elementor Motion purchases appear in the same customer account, with their own downloads and license entitlements.
- Sign in using an email link or your account password.
- Open the purchased product to download its current package and find its license key.
- Activate the key in that product's WordPress license screen. Manage site activations within your plan allowance.
- Use the billing or subscription action in your account for the relevant purchase. Do not share a private billing or download link.
- Contact support using your purchase email if an order is missing or access does not match the purchase.